
Instructional Videos

HOW TO USE THE Q-UNIT™ - UNBOX & DEMO

HOW TO USE THE Q-UNIT™ - REPLACING THE Q-CUP®

Q-Unit™ User Manual

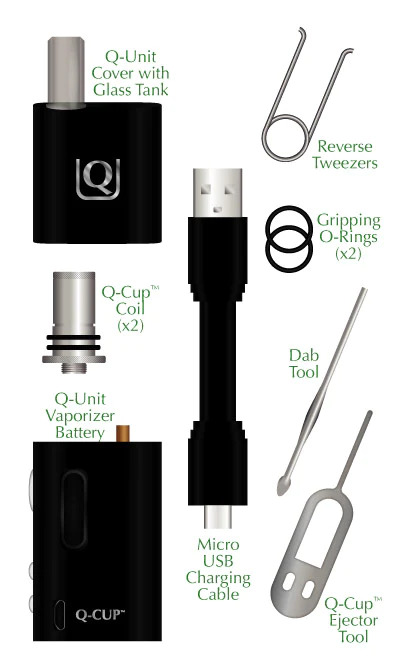
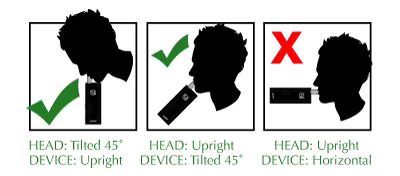
RECOMMENDED: Thoroughly Read All Instructions Before Using the Q-Unit™ device and Q-Cups®.  This device is made specifically and ONLY for use with Q-Cups®.  DO NOT place any other containers in this device.  DO NOT place any substances in direct contact with the heating element.

WARNING: The Q-Unit™ and its components (Q-Unit™ Vaporizer and replacement coils) are specially designed to optimize the vaping experience with the Q-Cup® system.  Any use of the Q-Unit™ or its components with any other aftermarket third-party product will void any claim to warranty.

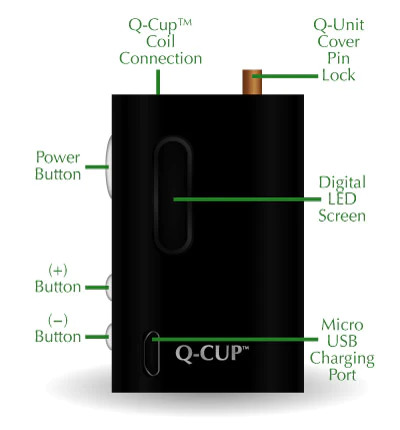
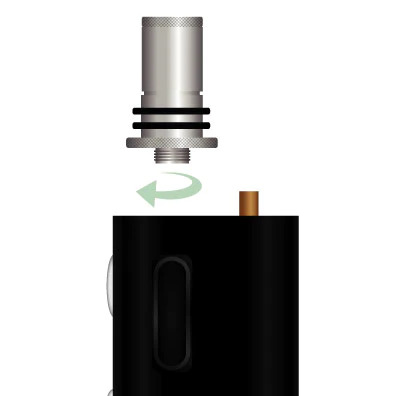
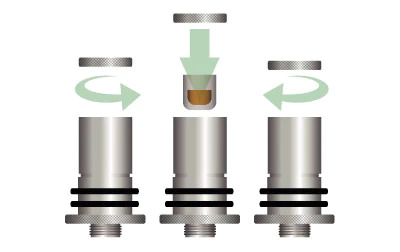
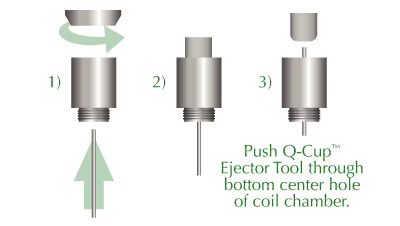
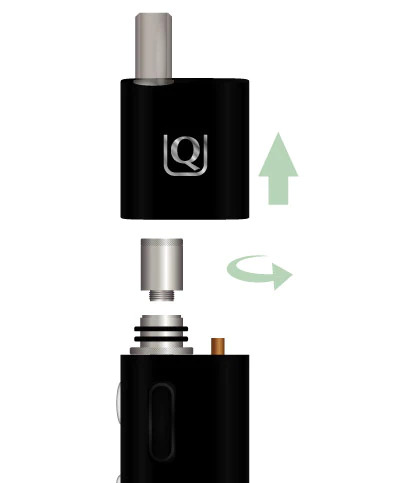
WARNING: Glass Dome, coil cover, coil housing and Q-Cup® get EXTREMELY HOT during use. Always allow components to sufficiently cool before touching or removing Q-Cup®.

Q-Unit™ Contents Include:

  • 1 – Q-Unit™ Vaporizer Battery
  • 1 – Q-Unit™ Cover with Glass Tank
  • 2 – Q-Cup® Coils
  • 1 – Micro USB Charging Cable
  • 1 – Accessory Tool Kit
    • 1 – Dab Tool
    • 1 – Q-Cup® Ejector Tool
    • 1 – Reverse Tweezers
    • 2 – Gripping O-Rings

Knowing the Q-Unit's™ Vaporizer Battery:

  • Battery Capacity: 1600mAh
  • Resistance Range: 0.15-2.50 ohm
  • Variable Wattage (output): 5.0W-60.0W
  • Charging Voltage (input): 4.2V
  • Material: Aluminum Alloy & Zinc Alloy

Installing the Q-Cup® Coil onto the Q-Unit™ Vaporizer Battery:

  • With the Q-Unit’s™ Cover removed from the Q-Unit’s™ Vaporizer Battery (pull cover straight up – do not wiggle back and forth as this may break the glass) screw the Q-Cup® Coil into the coil connection point at the top of the Q-Unit’s™ Vaporizer Battery (do not over-tighten coil to base as this may cause a short, preventing proper functioning).

Installing the Q-Cup® into the Coil:

  1. Remove the Q-Unit’s™ cover from the Q-Unit’s™ Vaporizer Battery (pull cover straight up – do not wiggle back and forth as this may break the glass)
  2. With the Q-Cup® Coil Exposed, unscrew the Q-Cup® Coil’s Cover from the top of the Coil Chamber.
  3. Insert Q-Cup® into the Coil Chamber with the open end of the Q-Cup® facing up.
  4. Re-screw the Coil Cover back onto the top of the Coil Chamber.
  5. Re-affix the Q-Unit’s™ Cover with Glass Tank to the Vaporizer Battery, making sure pin lock is in place.

Turning the Q-Unit™ 'On':

With Q-Cup® in Coil Chamber, and Coil and Q-Unit™ Cover installed, the Q-Unit™ is ready to be turned on for use.

  1. Press the Q-Unit’s™ Power Button five (5) times in two (2) seconds to turn on the Q-Unit™.  The LED screen will show:
  2. The LED screen will then display:

    • If using a NEW Coil for first time, press the (+) Button on Vaporizer Battery.
    • If using the same Coil from previous use, press the (-) Button on the Vaporizer Battery.
  3. After this step, the Q-Unit™ will go to its main interface, and is ready to use.
Attention: If the screen shows “CHECK ATOMIZER” when pressing power button to vape, please make sure the atomizer tank is connected to the Q-Unit™ Vaporizer Battery completely, or check if the Q-Cup® Coil Chamber is properly connected to the Coil Base.  If the “CHECK ATOMIZER” message persists, it may be time to change the coil for a new one.

Adjusting Wattage:

  1. Within the Q-Unit’s™ main interface mode, you can adjust the devices wattage.  The wattage control range is from 5W to 60W.
  2. Press the (+) or (-) buttons to adjust the Q-Unit’s™ Wattage. Single presses of button(s) increase by 1/10th of a Watt.  Press and hold button(s) for a more rapid increase/decrease in wattage.

NOTE FOR OPTIMAL USE: The ideal wattage for the Q-Unit™ is 25-30 Watts.  Over 30 Watts may prematurely burn out the Q-Cup’s® coil and decrease the efficiency, or number of hits you will receive from a single Q-Cup®.

Using the Q-Unit™:

With wattage set for optimized use, The Q-Unit™ is now ready for use!

PRE-HEAT – THIS IS ESSENTIAL FOR FIRST USE WITH A ROOM TEMPERATURE Q-CUP® THAT HAS NOT YET BEEN HEATED.

  1. To Pre-Heat, either rapidly push the power button 3 times (which will automatically activate the 10 second Pre-Heat sequence), or press and hold the power button for 10 seconds until the display says:

Depending on wattage used, additional Pre-Heat may be necessary.

NOTE: Higher wattage will vaporize the concentrate more quickly and produce more of a cloud.  Lower wattage will provide a cooler more flavorful vape.   

2. After Pre-Heating IMMEDIATELY press and hold the power button again and begin to inhale with a medium to slow consistent draw for best results.

NOTE: With Q-Cup® still heated, subsequent draws before the substance has had time to cool down can be taken without the need to pre-heat coil, or with less Pre-Heat time.  This will depend on time between inhalations and also the thickness of the substance in your Q-Cup®.

Proper Vaping Posture:

To avoid spillage of your concentrate while vaping, do not allow the device to exceed a tilt of more than 45˚.

Keep device upright through its cool-down phase to allow concentrate to solidify and to avoid spillage.

To Power Q-Unit™ 'Off':

Press the Q-Unit’s™ Power Button five (5) times in two (2) seconds to turn the device off.  The LED screen will show:


NOTE:  To avoid accidental use, make sure to properly power down the Q-Unit™ when not in use.

To Recharge Q-Unit™:

With the Q-Unit™ powered ‘OFF,’ plug the provided micro USB charging cable into the port on the Vaporizer Battery and then into any USB powering device.


The LED screen on the Q-Unit™ will display with an indication that the device is properly charging, along with a percentage of power.

When the device is 100% charged, remove the Q-Unit™ from the micro USB charging cable and the cable from its power source.

DO NOT CHARGE OVERNIGHT
Charging voltage: 3.0 – 4.2V
Minimum charging current: 1.0A

NOTE: For first time usage, the Q-Unit™ should be fully charged to achieve / maintain a good battery life.


Replacing the Q-Cup®:

WARNING: Allow all components to cool down before removing the Q-Cup®!!!

Once vaping material has been fully used:

  1. Remove the Q-Unit’s™ cover from the Q-Unit’s Vaporizer Battery (pull cover straight up – do not wiggle back and forth as this may break the glass).
  2. With the Q-Cup® Coil Exposed, unscrew the Q-Cup® Coil’s Cover from the top of the Coil Chamber.  Please allow sufficient cool down time and use the provided Gripping O-Rings to grip the holding cap and the coil housing.
  3. Turn unit upside down to remove the empty the Q-Cup®.
  4. Discard Q-Cup® and replace with a new one.

NOTE: The Coil Cover may become sticky after use.  To clean, simply use isopropyl alcohol.

Note: In the event that the Q-Cup® does not come out easily after unscrewing the holding cap, you may either: a) use the reverse tweezers tool included in the Accessory Tool Kit to grip the Q-Cup® from the edges and remove, or b) you may unscrew the coil chamber from the base and use the provided ejector tool, as shown, to push out Q-Cup® from the bottom of the coil chamber.  Use the provided O-Rings to grip both the base of the Q-Cup® coil and the screw cover when necessary.

DO NOT BANG COIL CHAMBER TO REMOVE Q-Cup® as this will damage the coil chamber and void any warranty.

Replacing the Q-Cup® Coil:

  1. After allowing all components to cool down, remove the Q-Unit’s™ Cover from the Q-Unit’s™ Vaporizer Battery (pull straight up do not wiggle back and forth as you may break the glass).
  2. Unscrew the Q-Cup® Coil from the base, leaving coil base attached to the Q-Unit’s Vaporizer Battery (do not over-tighten coil to base as this may cause a short, preventing proper functioning).
  3. Screw the new coil into the Q-Cup’s® coil base and reattach the Q-Unit’s™ Cover.

Cleaning the Glass Tank:

  1. Push down on mouthpiece and remove glass from the bottom of the Q-Unit™ Cover.
  2. Clean with Isopropyl Alcohol.
  3. Re-Insert glass from the bottom of the Q-Unit™ Cover until the mouthpiece comes out of the opening on the top of the Q-Unit™ Cover.

General Disclaimers & Warnings:

  • Do not use if pregnant or breast feeding or if you have an unstable heart condition, severe hypertension or diabetes.
  • Do not drop, throw or mishandle this product. Avoid allowing the device to collide with metal objects as these objects may short circuit the device.
  • In the case of any problem with the Q-Unit™ device or its parts, do not disassemble the battery by yourself or DIY this device in any capacity. Please contact us via the web at www.theqcup.com with any problems.
  • Please operate this product according to the following instructions.  Keep the Q-Unit™ away from excessive temperatures and humid environments.
  • Do not allow the Q-Unit™ to get wet or be submerged in water as this may cause a fire hazard.
  • Keep the contents of this package out of reach of children, non-smokers and animals.
  • The Q-Unit™ should not be treated as household waste. Instead it should be handed over to the applicable used battery and/or electronic equipment collection point for recycling.